Tuesday, 25 September 2012

Part 2

Here is part 2!
Dragon Maille bracelet
The next thing I moved onto from the Miton was jewelry as you can see in this pic I also started on the difficult stuff and then amazingly found it to be pretty easy compaired to the usual 4-in-1 english maille. The weave used here is standard Dragonmaille and I would rate it a 3 on the difficulty scale. The weave produced is a very close knit almost impenetrable wall of links which considering its solid nature is very flexible. It makes such a wall due to there being two types of links in the weave. All of this will be explained once I have posted the pattern for this weave.

Byzantine bracelet
Closeup of byzantine bracelet


This bracelet is made of ordinary one sized links and is pretty easy to make, I would rate it as a difficulty of about 2.


Butterfly bracelet
This is more for the Ladies in terms of style and is also very simple I would rate this at about a 1.

Square bracelet
This is just 4-in1 European folded up and joined at the top, also a 1 on my scale.

Part 3 coming soon.

Part 1 of all the things I have made

Like it says this is part 1. Each part will have more of the things I have made, each picture or group of pictures will have a short description of materials and technique used to make them, also I will include a difficulty rating from 1-10 1 being easy as breathing and 10 being as easy as breathing underwater.
Chainmaile Miton (Glove)
This was my first ever project. Only the trees know why I started on a project I would now rate about an 8 but I did. This Miton or glove is made from the English 4-in-1 style as you can see in the picture below.
Closeup of glove to show weave used
Although this weave is the simplest and fastest to make the fact that the glove has so many changes in direction is what made it difficult.
Closeup of glove to show fingers
  The fingers where relatively simple to do but attaching them was a nightmare. I found that I had done the weave the wrong way and instead of having it run vertical like it is here I should have made it run horizontal.

Look out for part 2!!!

What has kept me so busy?

To put everyone up to date from the last time I was here I will create a list of things that I have done and share a few tips as well that I picked up over the past year and a bit.

1. Finished school
2.Started studying
3.Started a facebook group solely dealing with chainmaile and had a wonderfull response go check it out at     https://www.facebook.com/groups/136071543134042/
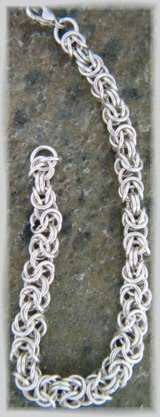
4.Experimented and played around with many patterns which i will be posting one every week from now as well as developed a few of my own ideas and products.
5.Discovered a miraculous invention to replace my handmade links. Spring washers! Available at any hardware store and very cheap compared to the rings I was making with my mandrel. The only downfall to these washer-links is that I cant make Dragonscale maile with them as their ratios are to tight.
6.Gained an interest in blacksmithing and heavy metal work (the interest was there already but I had never actually pursued it in any way) through a man I met in O-Hagens one night who was a blacksmith himself. He offered me an apprenticeship if i was able to gather the required items 1 being a log the size of me and 2 an anvil (More on these two items later)
7.Found my log still searching high and low for the anvil
8.Found the anvil but alas Chato (the blacksmith) has moved to Sauidi Arabia to work for a Shaik there who has a few hundred horses.
9.Now- Setting up my smithy and trying to save up to buy a blower which is essential to the forge

Monday, 24 September 2012

I'm back!

Well friends its been over a year now that I have neglected this poor blog but now I am back again and with even more to display after the time I have been absent. My work has gone from amateur to over the top. I recently came across an old anvil and am currently building up my smithy so as to be able to produce even grander metalwork. In due course I will be publishing a few articles and posts on blacksmithing as well as the main topic of this blog CHAINMAILE!! There are many pictures of recent work I have done that I will be sharing soon as well.


Friday, 24 June 2011

What is chainmaille?

Well friends basicaly it is a type of armour consisting of small metal rings linked together in a pattern to form a mesh. The word chainmail has been in use only since the 18th century; before that it was referred to simply as mail.

Nowadays it is used as jewelry as we have no beter use for it. I specialise in this art form and can produce just about any pattern provided to me. A list of works will follow this post as well as a pricing list. I will from time to time post any new and interesting info but for the meantime go to my facebook group ChainMaille Jewelry.

Below are a few examples of works that i can make.


Friday, 27 May 2011

Starting Maille

Before you Begin
Winding the Wire
Step 1
The first step in creating links is to create a helical coil of wire (basically a spring). The easiest way to do this is by using a tool called a Mandrel. In its most basic form a mandrel is simply a rod with crank handle on one end, placed between two vertical supports. Holes in the supports allow the rod to slide into position and spin freely.
The diameter of the rod will determine the interior diamater of the finished links.
More sophisticated mandrels replace the crank handle with a motor essembly.
A Mandrel

Step 2
Before you begin to wind the wire you must attach it to the rod. The easiest way to accomplish this is to drill a hole in the rod that is large enough for the wire to pass through. I recommend putting the hole at the end of the rod that is closest to the crank handle.
When placing the hole make sure to leave enough space for the hold to be on the inside of the support, as in the illustration.

The Hole

Step 3
Put the end of your wire through the hole.
Depending on the size of your wire spool you will want to mount it on a spindle so that it spins freely. I recommend that the spool be mounted in front of and lower than the mandrel, so that it doesn't get in your way.

Putting Wire Through the Hole

Step 4
Slowly start to turn the crank handle to begin winding your coil. Turn the crank clockwise for right-handed links or counter clockwise for left-handed links. Most of you will want right-hand links and all the illustrations on this site reflect right-hand links. You can be sure that you're winding right-hand links if the wire is going onto the rod from the bottom, as in the illustration.
As you turn the crank handle with your left hand, hold tension on the wire with your right hand and carefully guide the wire so that the coil winds evenly.
You're wire spool should be mounted so that it can spin freely.
When you reach the end of the rod cut the wire free at the hole and at the opposite end. Be careful, as you've spun the coil it has built up some tension, when you cut the wire this tension will be released.

Slide the rod away from the supports, then slide the finished coil from the rod

Winding the Wire

Cutting the Links
Step 1
Cutting links well is one of the hardest parts of this entire process. There are probably as many theories of cutting links as there are makers of chainmail. I'm going to share the method that I consider the most useful to beginning makers of chainmail.
The best links in chainmail have two characteristics that are governed in the cutting process. The most important of these characteristics is to have wire ends that are cut flushly, so that the ends of the wire butt together smoothly in the finished link. The finest links will butt together perfectly.
Cuttings links with perfectly straight ends is just about impossible when dealing with a coil. The only kinds of cutters that cut wire flushly are "Bypass Cutters", but they don't fit into the coil. This leaves bolt and cable cutters as the main option for cutting links from the coil. While bolt and cable cutters tend to leave a slightly angled cut edge I still consider them the easiest method for beginning makers.
Unless you tear phonebooks in half on a regular basis you will probably find it very tiring and downright painful to handcut links from the coil. To help alleviate this problem I recommend using a medium-sized set of boltcutters mounted in a vice. This allows you to use leverage to do all the hard work of cutting links.
The cutters in this illustration are mounted for cutting with the left hand and holding the coil with the right hand. Right handed cutting is probably easier for most people, so set up the cutters in the manner that is the most comfortable for you.
It is beneficial to put something under the jaws of the cutters to catch the links as they are cut.

Bolt Cutters Mounted in a Vice

Step 2
To cut links from the coil insert the end of the coil into the mouth of the boltcutters and close the handle. Make sure that the edge of the cutter blade is as tight as possible to the end of the wire, if it is not tight then there can be a gap in your links. (illustration "B" below)
Depending on the size of your coil and cutters you may be able to cut more than a single link at a time, it is a good idea to experiment.
I've read some instructions for making links that suggest that you should stretch your coils before you cut them. The idea being that you can later avoid steps that involve bending the links open. It has been my experience that all this supposed time saving step does is create links that are highly misshapen.

Cutting the Coil - Side View
Illustration "A" - Cutting a Link, Side View


Cutting the Coil - Top View
Illustration "B" - Cutting a Link, Top View

Step 3
You should check you're links for consistency as you cut them. Make sure that they are staying as round as possible and that the gap is as tight as possible.
Jump Link - Top ViewJump Link - Front View

Using Links
Tools
Different chainmail makers like different kinds of pliers. Some use needlenose, but I've never liked them. I prefer to use 7" Linesman Pliers, although some folks will find that 6" or 8" are more appropriate for their hand size.
You will need two pair of identical pliers to create chainmail properly.
This is one of my favorite pairs, made by a company called Jet.
Linesman Pliers

Important Technique
The main reason that I prefer linesman's pliers is because of the way the wide jaws will completely cover the width of most links. This allows you to apply very even pressure on the links as you manipulate them. Even pressure is vital in keeping links flat.
Lineman's pliers also have flat tips, most needlenose pliers have a rough surface over the entire length of the jaw which can damage the finish of links.
IMPORTANT! IMPORTANT! IMPORTANT! - The entire process of making chainmail in this manner is very stressful to your hands. Please do not attempt any of the following techniques if you concerned in any way about repetitive stress injuries. This site takes no responsibility for injuries that may be incurred by following these instructions!

A Mandrel
Bending Jump Links Open
Step 1
Before you begin working on any patterns it is a good idea to open a quantity of links. Each pattern on this site will list the proper ratio of closed to opened links for that pattern.
Place the jaws of your two pliers on the link to be opened, with each plier covering as close to 50% of the link as possible. Make sure that the break in the link is facing up. Twist the right plier away from your body and at the same time twist the left plier towards your body.
It is vital to apply even pressure with both pairs of pliers when using these techniques.
Opening a Link
Step 2
Open the link only as far as necessary to easily pass through other links. It's much easier to close links that aren't over-opened.
An Open Link

Bending Jump Links Closed
Step 1
Before you begin working on any patterns it is a good idea to close a quantity of links. Each pattern on this site will list appropriate portions of links to open and close for that pattern.
Place the jaws of your two pliers on the jump link to be closed, with each plier covering as close to 50% of the link as possible. Make sure that the break in the link is facing up. Twist the right plier towards your body and at the same time twist the left plier away from your body.
Again it is vital to apply even pressure with both pairs of pliers.
Closing a Link
Step 2
The link should be absolutely as flat as possible when closed.
A Closed Link
Step 3
If you are making your links out of a material that is specifically springy, then it might be necessary to slightly over-twist the link, so that when you release the pressure it will spring back to perfect alignment.
Compensating for springy material

Bending Open Links Closed
Step 1
Closing open links is more difficult than the previous steps, as it is always done when adding a link to other links.
Place the jaws of your two pliers on the jump link to be closed, with each plier covering as close to 50% of the link as possible. Make sure that the break in the link is facing up. Twist the right plier towards your body and at the same time twist the left plier away from your body.
In some cases it will be impossible to get an even grip on both sides of a link. It's important to get the best grip possible and twist the link with perfectly smooth and even pressure.
Don't worry if it takes awhile to develop a good technique for closing links, it probably took me 10 years to start twisting my links consistently and I still ruin 1% of the open links that I close.
Be careful when your hands are tired and you don't have a good, even grip on a link that you're trying to close. If your pliers slip it can be very painful, I've bruised myself several times trying complicated bends when I was too tired, I've even chipped a tooth from the force of pliers that slipped.
Closing a Link
Step 2
Again, the link should be absolutely as flat as possible when closed. Improperly closed links will be "Saddle-shaped".
A Closed Link

Misshapen Links
Step 1
Despite your best efforts with closing links properly you are bound to have a few that just don't come out right. I check every link I close to make sure that it is as round as possible.
When I find a misshapen link I try and fix it by applying pressure with the tip of the pliers, as in the diagram below. This works to straighten the link 7 out of every 8 attempts. It will take time to learn the correct method, so don't get discouraged if you ruin quite a few links in mastering this technique.
Incorrect Link
Step 2
Try and keep your links as close to perfect circles as possible.
A Straightened Link