Hey people.
Well I weighed that monstrosity that Max bought and it weighs a lovely 8kg or 18lb (for my more unusual readers of non South African origin who do not leave any comments but merely act as voyeurs I wish you would make a comment some of you). This is not as bad as I thought and I can even swing the thing myself.
In other news work has started again on my Chainmaile shirt as I have found a better supplier for spring washers and bought 4 kg (4156 units) of spring washers. By this I calculated that the piece that I have made weighing in at 6kg is made up of 5774 units of spring washers so far. It reaches just below my pectorals and is now lengthening.
Pictures of both processes will soon be coming
Thank you all for reading.
Tuesday 22 January 2013
Monday 21 January 2013
It begins
Well Friends.
Today Max bought the steel spring from the Truck Leaf spring company I found and he gave it to me.
To put it lightly its really heavy I cant imagine swinging it when it is done, there will have to be a lot of counterbalancing in the hilt and decorations. I will weigh it tomorrow and Inform you all of its weight. Apart from its weight is the flaw in it.
It being the leaf spring it is, it has a nice hole part way from the edge in the center of it. This is to accommodate the bolt that holds the stack of leaf springs together. Unfortunately this is all we could find. So the sword might end up a little smaller than anticipated. I will attempt to forge weld the hole closed but this will make it a weak spot. Another method is just to incorporate it into the blade and use it for the section that holds a gem in it as seen in the photos. Yet another method is that I can just bash at it and make the hole a little thinner and maybe hope it closes itself(Unlikely method).
So the great project is underway and so far all my weekends are booked up from here until the middle of feb. Oh the irony.
Well thank you all for reading and come back as soon as I have weighed the monster (Will be accompanied by a photo)
Friday 18 January 2013
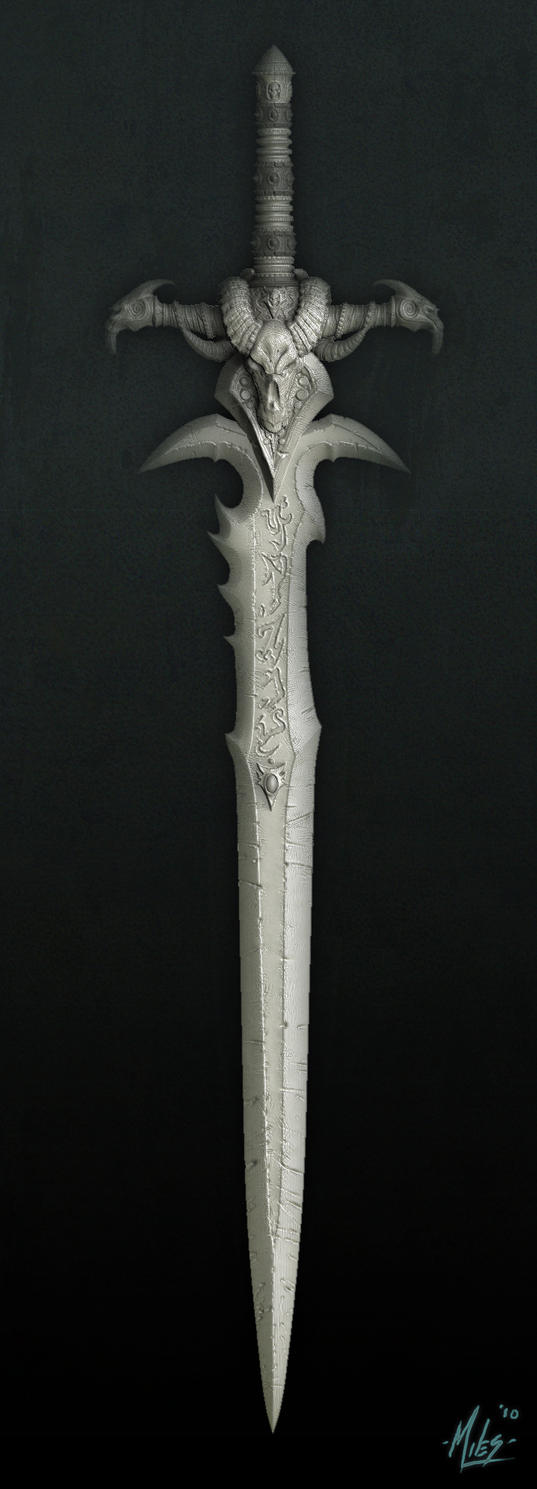
Frostmourne
My dear and crazy readers.
Today I posted a plea on Iforgeiron for help.
Help with this monster...
Today I posted a plea on Iforgeiron for help.
Help with this monster...
My good buddy and mad friend Max has commissioned it from me... And I have only just started my blacksmiths work... Here is to many hours of toil as well as many weekends of frustration wish me luck!
I will be posting process photos as I move along with it, thankfully Max is going to helping me and is going to be doing most of the brute work.
Thanks guys for reading and supporting my blog!
Wednesday 16 January 2013
My second welding project. The first was my forge.
So here are a few snaps of me and a few fiends at work making a security gate for the first time.

This is the gate.

Doing some grinding.

Me welding.

Is this a bad position to be in or is it OK to be above the weld?

My friend acting like a caveman.

The gate is up.

Welding in the hinges.
Well this was a real learning experience for me. My biggest learning curve was to have a striking plate so as to heat up the rod before the actual weld so as not to mar the final product as well as to make a perfect weld the first time and not one of those blobby spotty ones.
Tell me what you think, any advice is welcome as I am a beginner.
And thanks for reading hope you all keep coming back. Comments welcome on any of my posts.
And thanks for reading hope you all keep coming back. Comments welcome on any of my posts.
Vice leg support
This is another post in iforgeiron on how I made my vice and its support.
Could I sink another gum pole directly in front of my original one like this?

Like you say Im trying to use whatever I have lying around and I don't have a plate that big.
ps. What do you think of my paint skills ha ha.
Here it is!! all set up and ready to be concreted in.

This is to show the size of this vice.

And here is the plot of land I cleared out today. (My brother in the background)

Another of my brother. This is about as much work as he did the whole time he was "helping" me

Well here is the finished product.

And here is what my shop looks like so far.

Once again I hope you enjoyed it and thanks for reading.
Case of the floating anvil
Well here is a bit of fun, I had to move all 200kg of anvil and anvil base aproximatly 10m.
Many of you will say that this is easy I do not agree, especially as my floor is dirt and the
edges of the anvil base kept digging in while I attempted to brute strength it along its path.
Many thanks though go to my genius brother who sugested the Egyptian way of doing things as seen below.

Still needed a little bit of strength but not really that much.

And now my shop is looking a bit more organised.

Tomorrow I complete my forge with my mentor and then...
Mwhua ha ha ha ha ha ha ha ha the work can begin!
Sorry about the order of the posts at the moment, they were done on the site iforgeiron.com and I am transfering them to my blog. My next one is on how I did the vice support.
Thanks for reading and I hope you enjoyed it as well.
Thanks for reading and I hope you enjoyed it as well.
My homemade table forge
So this is my forge that I have made. It has been made from 10mm side walls 100mm high, the base is a 5ml plate with a hole in the center, the legs are just 50x50ml square tube with end caps in them to stop the rust. I have taken a trucks brake plate as the firepot and to this I have attached a 50ml galvanised plumbing pipe leading to my waste hatch and to my valve to control the air inlet. In the background you can see my grandfathers 120amp oil cooled welder.

The only concern I have with this build is that I had to weld the brake plate to the underside of the base plate as shown here.

All I have left to do with this is to finish all the welds around the edges and connect up the blower that I have made out of a washing machine motor and a blower fan blade and Ill have my own smithy ready to fire up. What do you think?
Well here it is. ITS FINISHED! Ha ha yay. In the photo is my mentor Riaan Bredenkamp who has taught me all I know now and still is teaching me. Also Is the first firing of the forge. It works like a beauty.


YAY!!! Forge done!
Thanks For reading hope you enjoyed it.
Thanks For reading hope you enjoyed it.
Subscribe to:
Posts (Atom)